This post contained too much content that tripped malware detection sites, so I’ve pulled this content from public view.
Category Archives: Computing
Backup Drobo NAS Content to CrashPlan on Windows


One of the advantages of online backup service, CrashPlan, is their ability backup NAS (i.e., network) drives to their cloud. While that is technically true, they do not officially support that feature from Windows. They do describe how this should work, but it requires you to reinstall CrashPlan (per user, rather than all-users). You might try that first, that may work.
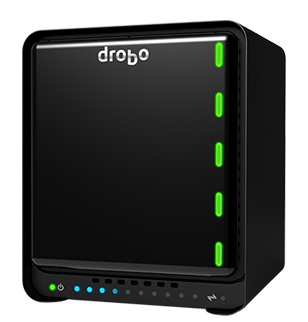
If your NAS device is a Drobo, then easily backing it all up is complicated by the fact that it does not support a singular view of all its content with a single share. This summarizes a few tips to get this all working.
View all Drobo Shares in a Single Share
First, let’s make sure that we can get a singular view of all the Drobo’s content from a single share. If we don’t do this, we’d have to map every of Drobo’s shares as a separate drive letter, on Windows. Not only is this tedious, it may not even work if you have too many shares since there are only 26 letters in the alphabet. If you do not care about this convenience, you can skip to the next section.
-
- In Drobo Dashboard, add Share, e.g., “AllShares”. It should probably be limited to specific users… read-only?
- ssh into the Drobo and navigate to /mnt/DroboFS/Shares
ssh my_drobo
my_drobo:~$ cd /mnt/DroboFS/Shares
I know, this is the “advanced” part you’ll need to have set up your Drobo for ssh access and enable a Windows utility to perform ssh (unless you have added the Bash support to Windows 10—you can use putty).
- Delete the AllShares directory that Dashboard created:
rmdir AllShares
- Replace Drobo’s expected directory with a symbolic link to the pointing to the parent directory of all the directories that are the source of each share:
ln -s /mnt/DroboFS/Shares AllShares
- You may need to reboot the Drobo for this to work correctly.
- And/or you may need to reboot Windows or restart Workstation in order for Windows to not be confused about user permissions (if you changed any).
net stop workstation
net start workstation
net start "Computer Browser"
net start "..."
Now that we have a way to see all the NAS’s content via a single share, we can configure CrashPlan to back it up.
Allow CrashPlan to backup NAS volumes
CrashPlan requires that files and directories being backed up, in Windows, be accessible via drive letters. Thus, network “shares” need to be mapped as local drive letters in order for the Windows version of CrashPlan to recognize them.
After getting my system working, I realized that I did not have to do any of the steps I documented below. According to CrashPlan’s own document, “Backing Up A Windows Network Drive,” CrashPlan can be reinstalled per-user rather than for all users, system-wide; then the CrashPlan application will recognize the users’ network drive mappings. I did not get a chance to verify that this works. If it does not work for you, continue with the following steps.
If CrashPlan is installed for All Users—the default—then it cannot see the network drives mapped by a specific user, since it is running as a “system” application. We need to set Windows to map drives which are visible to system applications, then they can be added to CrashPlan’s backup set.
The following is a summary of the detailed, illustrated steps from “The Crashplan Network Drive Backup Guide.” I recommend you follow that guide after going through the summary I’ve written, here.
- Create batch file to NAS volumes as local drives.
- Create a batch file. It can be any name, but it must have a .bat extension. Let’s call it AutoStart.bat
net use N: \\DroboNAS\AllShares /username:WORKGROUP\Bill password
Pick the drive letter (shown in the example as “N”) that you’d like it to use. Replace “DroboNAS” with the network name of your Drobo device. “WORKGROUP” is the workgroup or domain name that it belongs to and “Bill” and “password” correspond to the user that you’ve set up to access AllShares.
I had trouble, initially, being able to set user-specific access permissions. What worked for me was to ensure that both the Drobo and my Windows machines were using the same workgroup name. And, because Windows requires the name be uppercase, it seems I had to ensure that the Drobo also used uppercase characters for the workgroup name.
If you have multiple shares for the NAS and/or more than one NAS drive, add more entries to the batch file for each drive, as necessary.
- The batch file can be anywhere; the CrashPlan installation directory is as good a place as any. %PROGRAMFILES%\CrashPlan (e.g., C:\Program Files\CrashPlan)
- Create a batch file. It can be any name, but it must have a .bat extension. Let’s call it AutoStart.bat
- Schedule file to run at login via Task Scheduler. It must be runnable as SYSTEM.
- Reboot or create a one-time trigger to execute the batch file during the current session (as SYSTEM).
- In the CrashPlan app’s Backup tab, click the Change… button under the Files section.
- Add the new drive and select/unselect share directories be included/excluded directories, as you normally would for local files and directories in the CrashPlan application.
Resources
- CrashPlan, “Backing Up A Windows Network Drive.” If your version of CrashPlan is recent and do not mind re-installing CrashPlan per-user, then the instructions are short. Initially, it wasn’t clear to me why this would work so I didn’t take this path.
- TipsDotCom.com, “The Crashplan Network Drive Backup Guide.” This is the guide that I followed. While it is illustrated with an old version of Windows, it still works on Windows 10.
Windows 8.1 Tiled “Metro” Apps Stopped Working! Here’s a Fix
I own both Macs and PCs. I try not to be too much of a fan-boy and stay religiously neutral. Both operating systems start to feel their age after being subjected to accumulation of apps and use. I can run both for weeks on end without rebooting. But I have only been running Windows 8.1 for less than 2 months and I already ran into a severe quirk for which there was no obvious solution, none of the new, “Metro”, tiled applications would run. Trying to untangle this led to frustrating dead-end after dead-end. This kind of bad behavior is what gives Windows a bad reputation.
Jump down to the solution if you don’t care about the back-story. Continue reading Windows 8.1 Tiled “Metro” Apps Stopped Working! Here’s a Fix
Bring the Quick Launch Back (no need for “pinned” TaskBar Items)
 When I get a new product, I like trying out new features long enough to be able to evaluate whether they might be useful. Windows 7 introduced the “Pin to Taskbar” feature to replace the Quick Launch toolbar of prior versions of Windows. I found that the “Pin” feature provides no advantages over the Quick Launch toolbar and some disadvantages. If you have not used this feature before—in some XP installations, Quick Launch was not activated by default—you might try this out to see if it improves your efficiency in using Windows. Windows 7 and 8 have made this more difficult, so you’ll need to follow the instructions, following the break, to bring it back. Continue reading Bring the Quick Launch Back (no need for “pinned” TaskBar Items)
TV Addicts database: TV.com
 Are you a TV addict? Want to find out what you missed in a TV show or the status of a TV show? Though tv.com was bought by CBS, it retains its neutrality and reports information about more TV shows than you ever knew were on the air (or were). It is the IMDB of TV…with character. Continue reading TV Addicts database: TV.com
Tips for TripIt to Manage Your Travel Details with No-effort!
 TripIt is an almost magical web service (with mobile apps available) that keeps your travel itinerary organized for you, automatically. If you travel, even a moderate amount, TripIt takes the load off your mind, secure in knowing that you have all the information you need while you travel. Here are some tips for using TripIt to consolidate all your important travel information with zero-effort!
TripIt basically does two things:
- Accepts travel confirmation emails and
- Build a detailed itinerary calendar
That is, you forward the travel confirmation emails from airlines, hotels, rental cars, etc. and TripIt builds an itinerary and maintains a personal calendar that contain all the relevant travel information from those emails.
This can be done without paying for TripIt. It has other features and TripIt Pro has even more features that maybe useful for frequent super-travelers.
No-Maintenance Usage Tips
To make TripIt into a no-maintenance tool, you should do the following: Continue reading Tips for TripIt to Manage Your Travel Details with No-effort!
Be a Little More Dashing in Your Text Communiqués
Again, I am off on a tangent. This is actually a tangent of a tangent (so I am way off course!). If you care about typefaces and the look of your text communications on your computers and smart-phones, as I do, then you probably feel constrained by the limited typewriter character set in your electronic communication. Finding the exact character to look and act like you want can distinguish and beautify your communiqués. It turns out that things have evolved a bit since the typewriter days and, though keyboards doesn’t show this, there are a bunch of other standard characters that are available; double-quotes (“ and ” vs.
"), single-quotes (‘ and ’ vs. '), ellipsis (… vs. ... —which saves also save you two characters in limited-length messages such as tweets and text-messages), and the topic of today’s post, dashes: hyphens (-), en-dashes (–), and em-dashes (—). I simply want to be able to enter these characters to make my messages look better, without a lot of tedium.
As tangents go, this led to more tangents; but here, I will try to distill these meanderings to something digestible and useful. So, first, a little about dashes then some howtos to enter the one you want on computers, tablets, and smart-phones you’re using
Dash, Dashes, and More Dashes
It turns out that dash/hyphen, en-, and em-dashes not only look different, they have different meanings. Reading through the Wikipedia’s “Dashes” entry reminds me of one of my peeves: when composing a document’s formatting, apply semantic formatting independent of how you want it to look (and address the look of the elements separately)—do not format content based on how you want it to look. (But I digress again…). Continue reading Be a Little More Dashing in Your Text Communiqués
Where to Blog? Consolidate!
 In this blogging age (well, I might be a late bloomer) I have long anguished over where to keep my journal of the random thoughts that I have spread across several blogs. There are two conflicting issues that has driven my anguish:
- If anyone is following me on any of my blogs, then I do not want bore them with too much off-topic content.
- It is a pain to remember where to post what.
But, it turns out that I don’t blog consistently on any one topic—I’m kind of A.D.D. that way—and I don’t think anyone but my mom is reading this, anyway. I blog as an outlet to practice writing (your redlines happily accepted); with the practical side-effect of using the cloud to back up my memories. So, I have decided to consolidate. My future ramblings involving my sphere of interests will all happen here (except the startup/entrepreneurship and programming topics that I post on Cache Crew blog). Since I am using WordPress (blogging software), I can organize my interests by category and use tags to index postings. We will see how well this allows me keep the content organized, easy to follow, and simple to find. I plan to move the content from all my other personal blogs here as well, so I can find them all in one place. Continue reading Where to Blog? Consolidate!
“Unhack” Your Facebook Account
If you are lounging around at a café, Facebooking using their public wifi, note that a hacker with the right software can grab your login information and do you the favor of Facebooking for you, without your help. Realistically, his kind of hack is not very prolific, but it is easy to block, so it’s better to be safe than sorry. Since Facebook makes this simple setting unduly difficult, the following is a quick step-by-step (as of July 4, 2011).
- Go to the “Account” drop-down menu in the upper right of your Facebook page.
 Continue reading “Unhack” Your Facebook Account
Gmail “Anonymizer”: Using Gmail without others knowing about it
![]() Free email is always popular. With Gmail having been out for a while and all those nifty Google services which require a Gmail ID as a prerequisite, Gmail is more popular than ever. Coupled with that, its great Spam filtering and it’s no wonder why so many people use it. Even if you have your own domain or other email mailbox, the Spam protection alone might be a reason to switch to Gmail. Other reasons: almost unlimited mailbox size, fast searching of all your email, a single place to organize all your email, a single view to your mail organization from any email client (via IMAP), and versatile mail management via labels.
Free email is always popular. With Gmail having been out for a while and all those nifty Google services which require a Gmail ID as a prerequisite, Gmail is more popular than ever. Coupled with that, its great Spam filtering and it’s no wonder why so many people use it. Even if you have your own domain or other email mailbox, the Spam protection alone might be a reason to switch to Gmail. Other reasons: almost unlimited mailbox size, fast searching of all your email, a single place to organize all your email, a single view to your mail organization from any email client (via IMAP), and versatile mail management via labels.
So, if you are going to use Gmail, here’s some advice on how to use it right. Continue reading Gmail “Anonymizer”: Using Gmail without others knowing about it

